日期时间函数技巧分享
日期时间函数格式化
Axure 的日期和时间函数在取值的时候,有时候会取到这样的值:2023-1-1 9:9:9,但在大多数时候,如果只取到 1 位数,我们是需要做一些格式化处理的,比如在数字前面补 0:2023-01-01 09:09:09。
但如果要你自己写这些格式化公式,你可能会写到奔溃,因为公式太长了,所以以下我整理了一些 Axure 日期时间函数比较常用的一些格式化的公式,你可以直接取用(已经在奔溃边缘。。。)
| 格式示例 | 函数公式 |
|---|---|
| xxxx-xx-xx | [[Now.getFullYear()]]-[[0.concat(Now.getMonth()).slice(-2)]]-[[0.concat(Now.getDate()).slice(-2)]] |
| xxxx-xx-xx xx:xx:xx | [[Now.getFullYear()]]-[[0.concat(Now.getMonth()).slice(-2)]]-[[0.concat(Now.getDate()).slice(-2)]] [[0.concat(Now.getHours()).slice(-2)]]:[[0.concat(Now.getMinutes()).slice(-2)]]:[[0.concat(Now.getSeconds()).slice(-2)]] |
| xxxx-xx-xx xx:xx | [[Now.getFullYear()]]-[[0.concat(Now.getMonth()).slice(-2)]]-[[0.concat(Now.getDate()).slice(-2)]] [[0.concat(Now.getHours()).slice(-2)]]:[[0.concat(Now.getMinutes()).slice(-2)]] |
| xxxx/xx/xx | [[Now.getFullYear()]]/[[0.concat(Now.getMonth()).slice(-2)]]/[[0.concat(Now.getDate()).slice(-2)]] |
| xxxx/xx/xx xx:xx:xx | [[Now.getFullYear()]]/[[0.concat(Now.getMonth()).slice(-2)]]/[[0.concat(Now.getDate()).slice(-2)]] [[0.concat(Now.getHours()).slice(-2)]]:[[0.concat(Now.getMinutes()).slice(-2)]]:[[0.concat(Now.getSeconds()).slice(-2)]] |
| xxxx/xx/xx xx:xx | [[Now.getFullYear()]]/[[0.concat(Now.getMonth()).slice(-2)]]/[[0.concat(Now.getDate()).slice(-2)]] [[0.concat(Now.getHours()).slice(-2)]]:[[0.concat(Now.getMinutes()).slice(-2)]] |
| xxxx年xx月xx日 | [[Now.getFullYear()]]年[[0.concat(Now.getMonth()).slice(-2)]]月[[0.concat(Now.getDate()).slice(-2)]]日 |
| xxxx年xx月xx日 xx时xx分xx秒 | [[Now.getFullYear()]]年[[0.concat(Now.getMonth()).slice(-2)]]月[[0.concat(Now.getDate()).slice(-2)]]日 [[0.concat(Now.getHours()).slice(-2)]]时[[0.concat(Now.getMinutes()).slice(-2)]]分[[0.concat(Now.getSeconds()).slice(-2)]]秒 |
| xxxx年xx月xx日 xx时xx分 | [[Now.getFullYear()]]年[[0.concat(Now.getMonth()).slice(-2)]]月[[0.concat(Now.getDate()).slice(-2)]]日 [[0.concat(Now.getHours()).slice(-2)]]时[[0.concat(Now.getMinutes()).slice(-2)]]分 |
| xx时xx分xx秒 | [[0.concat(Now.getHours()).slice(-2)]]时[[0.concat(Now.getMinutes()).slice(-2)]]分[[0.concat(Now.getSeconds()).slice(-2)]]秒 |
| xx时xx分 | [[0.concat(Now.getHours()).slice(-2)]]时[[0.concat(Now.getMinutes()).slice(-2)]]分 |
| xx:xx:xx | [[0.concat(Now.getHours()).slice(-2)]]:[[0.concat(Now.getMinutes()).slice(-2)]]:[[0.concat(Now.getSeconds()).slice(-2)]] |
| xx:xx | [[0.concat(Now.getHours()).slice(-2)]]:[[0.concat(Now.getMinutes()).slice(-2)]] |
星期格式化
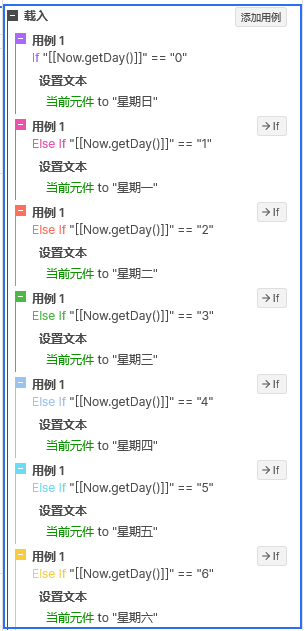
在 Axure 的函数中,getDay 和 getDayOfWeek 都可以获得当天是星期几,前者以数值形式表示,如“周二”就是“2”;后者以英文表示,如“周二”就是“Tuesday”,但在中文的表达习惯中,应该是用“周二”或“星期二”表示,因此在显示时需要进行格式化处理,以 getDay 为例,我们可以通过判断条件来对输出的内容进行格式化,比如我们想在一个矩形载入的时候显示当天是星期几,可以这么写交互:

运行的结果:
判断指定日期是星期几
在 Axure 中,Now.getDay() 可以用来判断当天是星期几,我们可以观察到,既然“Now”是表示当前,那是不是把“Now”换成指定日期就可以换算指定日期的星期了。
我们可以试一下,在一个写着日期的矩形上点击时,将矩形上的日期换算成星期:
交互如下:
点击后的效果如下,下图分别是点击前和点击后的效果:
我们可以发现,函数没有被成功执行,是不是意味着这个思路是错误的呢?其实不然,函数之所以不能成功执行,是因为获取到的日期是文本类型,而 getDay() 需要日期类型才能正常计算星期。在 Axure 提供的函数中,只有一个 toDateString() 的函数用来将日期类型转换成文本类型,没有提供反向转换的函数,因此我们如果要实现指定日期转换成星期,需要用到另外一种曲线救国的方式。
首先在工作区拖入一个文本框,命名为“日期文本框”,类型改为“日期”:
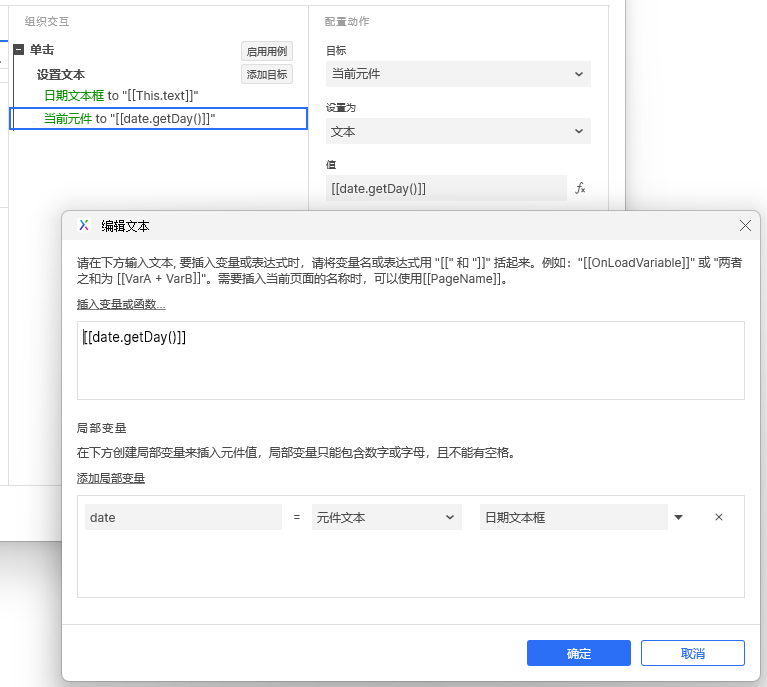
接下来修改点击矩形的交互,先将矩形的文本赋值给“日期文本框”,再取“日期文本框”的值调用 getDay() 函数,获得的值再赋值给矩形:

再看一下点击后的效果:
可以看到矩形正确将日期换算成星期对应的数值,最后可以将“日期文本框”隐藏或拖到工作区的负空间,看起来就像是点击直接转换一样。
在这个案例中,用到了“日期文本框”来将文本转换成日期格式的技巧,在设计中可以举一反三,比如计算两个日期之间的天数等。
以上便是本文的全部内容,希望对你有所帮助!